How to add Mailchimp groups to be GDPR complient
This article is provided as a resource, but it’s not legal advice. We encourage you to speak to legal counsel to learn how the GDPR may affect your organization
Click here to watch how to Add GDPR Options to the FormIf your business is based in the European Union (EU), or you process the personal data of individuals in the EU, the General Data Protection Regulation (GDPR) affects you. When relying on consent as your legal basis for processing, the GDPR says the consent you obtain must be freely given, specific, informed, and unambiguous. You also must clearly explain how you plan to use their personal data. We’ve updated our form options to help you stay compliant with this law. Our optional, additional fields include checkboxes (Mailchimp groups) for opt-in consent, and editable opt-in messages that can help you explain how and why you are collecting data. In this guide, you’ll see how additional fields can help you comply with the GDPR.
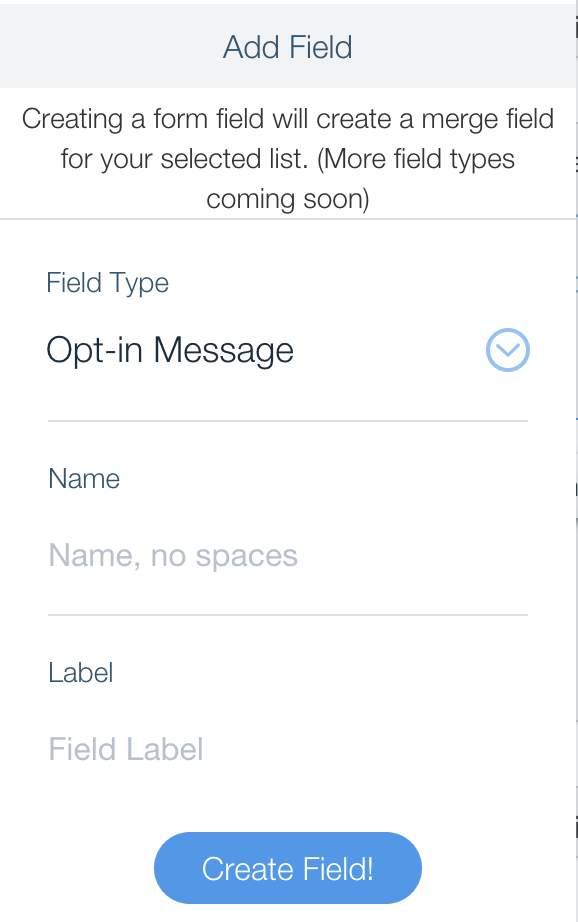
1. Adding a consent message (Opt-in message)
We suggest you start by adding a consent message, this message will appear under the email field and before the checkboxes.
To add this field,
- Click the settings option on the left menu and then the additional fields option on the right
- Now, to add the new field click the new field button
- You will be presented with a form, under type choose the Opt-in message
- You can input any name you'd like as long as you didn't use if for another field
-
Under the description option, input your consent message to your users, one example of a text can be:
"You agree that [organisation name] may collect, use and disclose your personal data provided in this form, for sending marketing materials that you have agreed to receive, in accordance with our data protection policy. You may unsubscribe from this list at any time." - That is it, you may click "Add Field"
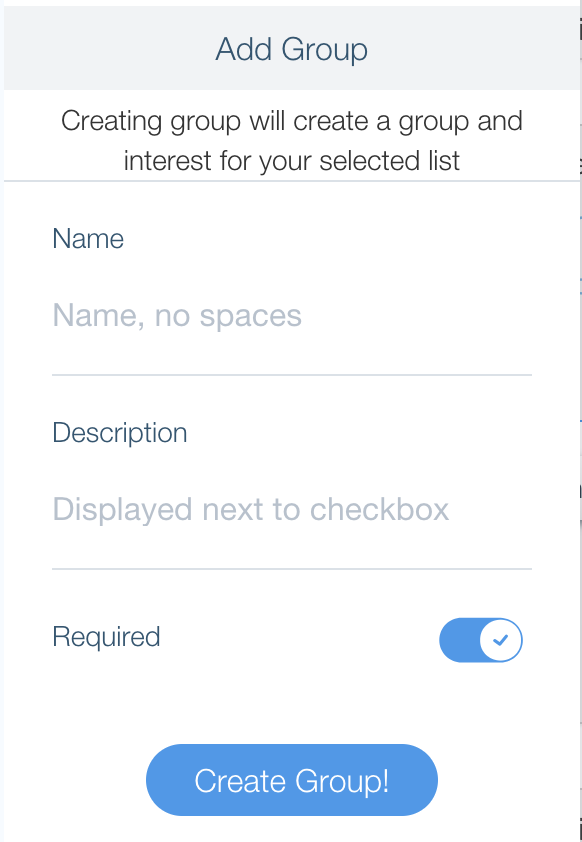
2. Adding a checkbox (Mailchimp Group)
Each checkbox represents a Mailchimp group. New subscribers that check the checkbox will be added to that group.
- Go back to the additional fields page
- Now, to add the new group click the new group button
- You will be presented with a form, input a name that will best describe this group
-
Under the description option, input the text that you want to be displayed next to the checkbox, for example:
"I would like to receive email updates and marketing materials from Company.com" - That is it, you may click "Add Group"
3. The Mailchimp Groups
Now that everything is setup you may wish to see your newly created Mailchimp group and later see all subscribers added to it.
- Go to your Mailchimp dashboard
- Click on audience and then choose your selected audience
- Now click "View Contacts", then "Manage Contacts" and then "Groups"
- If you added a checkbox you will see your created group, if you click "View Groups" you will see how many contact are in that group.
If you have any questions, concerns or comments you may always contact us at support@contactcollection.com